All EOS blogs All Spain blogs  Start your own blog Start your own blog 

IAN & SPAIN

WELCOME TO MY BLOG. HAVING LIVED IN SPAIN FOR OVER TWENTY YEARS I HAVE TRULY MANAGED TO IMMERSE MYSELF IN THE LOCAL CULTURE AND FEEL TOTALLY INTEGRATED. I WILL BE WRITING ABOUT MY PASSION FOR SPANISH FOOD AND DRINK AS WELL AS ITS CULTURE, PEOPLE AND PLACES OF SPECIAL INTEREST. PLEASE FEEL FREE TO LEAVE A COMMENT.

Tinned tuna? Why not make it yourself?
Friday, October 30, 2020

I was fortunate enough to learn from a good friend of mine called Angel from San Sebastian, a fisherman by trade and from a long line of fisherman going back several generations, this great recipe. 

Fishermen are renowned for being tough people and Angel is no exception, contradictory to what his name may imply... He has a handshake that would crush your fingers if you gave him half a chance so every time we meet I make a conscious effort to give a firmer and firmer handshake to try and counteract the force he exerts! So when I saw him working in the kitchen in such a delicate manner it seemed quite surreal. He was preparing his mother’s preserved White Tuna (when it is cooked it turns white), or as they refer to it here as “Bonito del Norte” (Thunnus alalunga) which is more highly prized than normal tuna fish for its fantastic delicate flavour, which is not at all “fishy”. This was something that I had always wanted to learn as I find myself eating canned tuna throughout the year and it seems to be getting more and more expensive every year and the quality worse and worse, although by UK standards it is still pretty good.

Buying good quality preserved tuna can set you back an arm and a leg so I thought now was the ideal time to learn and also share this discovery with you all. I am not going to pull the wool over your eyes, it is simple but it is also very time consuming so I suggest you make a lot of it to last the entire year! It's like a large Christmas dinner; after making the stuffing from fresh chestnuts, the garnishes, roasting and basting the turkey, puddings etc. its such a palarva that you need a year to bring yourself round to doing it again! Maybe I’m exaggerating here, but I haven’t really preserved much food before, just chutneys and the odd raspberry jam when I used to help my Dad as a kid, a huge chutney fan! So this was a first for me, at least with fish.

Being honest fish isn’t my cup of tea but I am a lover of tinned/preserved tuna, I never get tired of it so I always have it in the cupboard like most other people in the country, but when I tried the real deal, homemade preserved tuna, the difference was outstanding and well worth the effort, once it's done, it's done and you can spend the entire year enjoying it!  October is pretty much the month for the White Tuna season so it should still be readily available in supermarkets at around 8-10€/kg but if you go straight to the fish market you can get it cheaper, however, if you buy it already reserved in cans you’ll be paying in the region of 24€+/kg for and I eat a lot of tuna, so it adds up at the end of the year and the cost is not so “Bonito”.

There are two ways of preparing preserved tuna you either pre-cook it and then preserve it or you preserve it raw and then cook it in the jar. It depends on how you like your tuna. If you cook it in the jar it will be much softer and delicate and it will keep all of its flavours as nothing is lost in the cooking process. I personally find this method to have too much flavour for my liking, as I am more accustomed to traditional canned tuna, which is always pre-cooked. It's a question of tastes but Angel does it both ways depending on what he is going to use the tuna for. However, I only know the pre-cooked method so far and when I have the raw method I will share it with you.


You will need the following ingredients for eight 450g jars:

2,5kg White Tuna (Bonito del Norte)
Rock Salt
1L Extra Virgin Olive Oil (not a strongly flavoured oil, so Arbequina is a good choice, we want no bitterness and no pepper otherwise it will overpower the taste of the tuna)

8 Jars (450g each) for preserving food. 

You can either ask for the tuna to be cleaned and deboned in the supermarket or do it yourself at home, but whatever you do make sure it comes in large pieces or in thick slices of about 2cm. Make sure you have a pot which will take all the fish in one go or you be at it all day. 


1. Place the tuna in the pot and cover it with saltwater. The water we need to prepare beforehand. So we should mix about 240g of rock salt with 3 litres of water. Once it has completely dissolved add it to the pot, if the water doesn’t completely cover the fish repeat this step until the tuna is completely covered by the saltwater.

2. Turn on the extractor fan and close the kitchen door, otherwise the house smell of fish, a little...

3. Put on full heat until it is boiling, remove the lid from time to time to scrape off the foam, which rises to the surface of the water. When it is boiling, lower the heat to a minimum and continue cooking for 60 minutes. Make sure the tuna is always covered with water, so you’ll have to be patient and keep a close eye on it.

4. After 60min. turn off the heat and let the tuna and the water cool down naturally, about 4 hours later it should have cooled down enough, take it out of the water and dry it completely with a kitchen towel. Wrap the fish in tin foil and leave it in the fridge overnight so it cools down completely and the meat hardens becoming more compact.

5. The next day, the first thing we need to do is sterilise the jars, you can either do this in the oven or in a pressure cooker. You could place them in boiling water for 30 minutes but really to be sterilised completely they need to be at a minimum of 120ºC for at least 30 minutes, so to be on the safe side we put them in the oven at 140ºc for 40min. There is a bacteria that can survive without oxygen and it is only killed at temperatures above 120ºC, I can’t quite remember what its called but we don’t want it, just in case! If the jar lids have a rubber seal, well you will have to sterilise them in water with a pressure cooker.  Once sterilised let them cool down upside down on a clean cloth/kitchen towel. Make sure they are completely dry before filling them.

6. Take the tuna out of the fridge and place it all on a large tray. If you already cleaned it before cooking (which we did) all you have to do is remove the unsightly dark pieces if there are any left. If you didn’t clean the fish beforehand remove the skin, bones and darker coloured pieces of tuna fish. All we want is the clean white flesh. Cut up the pieces of tuna meat into large chunks or strips, but measure the ideal size according to your jar and remember that we need at least 1cm of air between the surface of the oil and the jar lid so we can create the vacuum later.

7.  Now pour about 1 cm of extra virgin olive oil into the jar, we pour this in first so that when we start to pack the jar with tuna no gaps of air are trapped at the bottom. Start to place the pieces of tuna steak in the jar and make sure you pack them very tight but be careful not to break them. Once full if you need more olive oil top it up and make sure all the tuna is completely covered with oil but leaving at least 1 cm between the oil and the top of the jar. Bang the jar a few times on the table to make any air bubbles come to the surface or use a bbq skewer or something similar to carefully move the tuna inside and make sure the oil is evenly distributed and there are no air bubbles.

8.  Now close and seal the jars very tightly. Place them in a pan of boiling water to poach them. Make sure the water does not reach or touch the lid. Boil them for 30 minutes. This is to create the vacuum inside. After 30 minutes remove from the heat and leave the jars in the water for approx. 3-4 hours, then we remove them and place them upside down on a kitchen towel overnight to make sure the vacuum has been created properly.

9. The following morning put them away in storage for 3 months before opening. You will need a cool dry ventilated cupboard. If you don’t have one you can also keep them in the fridge. You will need this time for the flavour to settle in. The day you open it if you notice the slightest unusual smell or discolouring discard it immediately. More than likely the vacuum wasn’t done properly or the jars were not properly sterilised. Don’t risk it, chuck it out. However, if you take care and follow the steps you shouldn’t have any problems. However, if the centre of the lid doesn’t flex it is a sign that the vacuum seal has been done correctly and as this method involves a double technique for the vacuum it should be fine.

Preserved tuna can last in good storage conditions easily a year, if you need any longer, you prepared too much! Once opened it will last up to two weeks in the fridge. None the less I suggest preparing jars that are suitable for the amount you might need in one sitting depending on how many you are in the household. I find ½ pint jars to be ideal for two people. And my last piece of advice is that you buy a good quality extra virgin olive oil. After all that oil will be your tuna’s home for quite a few months and I personally wouldn’t want a refined oil being soaked up by my tuna steaks!


So there you have it, 

Happy Eating!


Like 3        Published at 6:14 PM   Comments (3)


Some great ways to enjoy white asparagus from Navarra
Friday, October 23, 2020

The asparagus is one of the most emblematic products of Navarra, this fertile land is often referred to as the larder of Spain. On the banks of the Ribera del Ebro, with a warm Mediterranean climate and located in a landscape scattered with hills and small mountain ranges, the Autonomous regions of Navarra, Aragon, and La Rioja can be discovered. This area is where the Asparagus of Navarra is cultivated and protected by its Designation of Origin as well as many other Spanish gourmet delights from the north that I will be writing about in future posts and have already mentioned before in earlier posts such as the Cecina from Leon.
 
Asparagus is a very contemporary product despite its ancient origins, as proven by Egyptian paintings dating back to 3,000 years BC that show the first images of this vegetable. However, the first time they were actually mentioned was during the Roman Empire in writings by authors such as Pliny.
 
According to legend, the first seeds of this refined foodstuff were brought from Baghdad in the baggage of a local citizen who was obliged to leave the city and ended up settling in Cordoba. A man from Tudela, who was travelling in those parts, tasted the delicacy for the first time and asked him to spare a few seeds, sowing them on his return in the capital of the Ribera region and making asparagus one of the leading lights of Navarrese cuisine.
 
                 
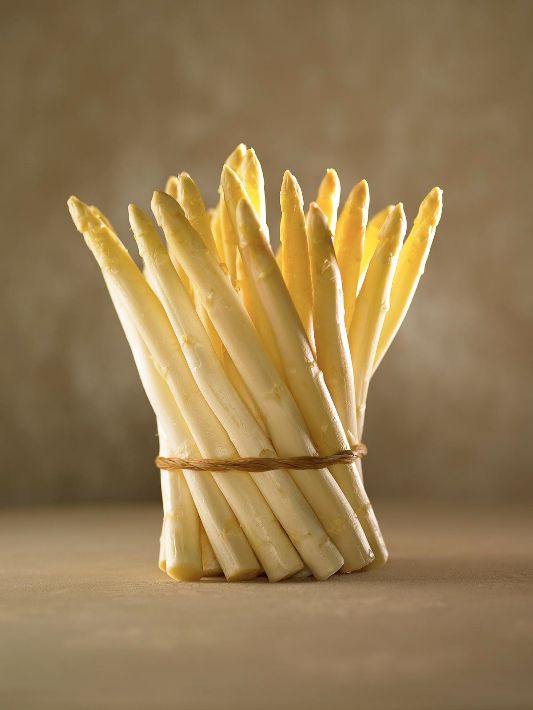
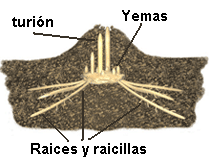
The Asparagus of Navarra is a perennial plant which loses its leaves and trunk during the winter, with a productive life that lasts from six to eight years. It has a very powerful root system composed of main roots which grow horizontally and from which the small secondary roots grow. From a central stump or bulb turions or asparagus grow upwards looking for light.This is the secret: to stop them reaching the light. If the "turions" or stems reach the surface, the frond is formed. On the other hand, if they are harvested before they see daylight, we have white asparagus, if not they would turn green with photosynthesis so the earth is frequently raised to form little hills so that the asparagus never sees daylight until it is ready to eat.


Asparagus is planted during February, placing it at the bottom of a furrow and covering it with sand afterwards. During the spring, the stems grow, and in this period and throughout the summer, the plant accumulates reserves in the roots to be able to sprout the following year. During the winter, the parched frond is cut, and the land is prepared.
In the second year, during March, before the plant begins to sprout again, the ridging is carried out. A ridge is a small pile of earth on the plantation line so that the sprouts reach the surface much later. This provides them with their traditional white colour and makes them much more tender and sweeter
 
Although the Asparagus from Navarra has traditionally been related to a canned or bottled product, in recent years, strong demand has grown for fresh white asparagus. Fresh white asparagus is available during the harvest-time, which is between April and June. The fresh white asparagus needs to be peeled and normally boiled, a simple process that allows you to enjoy their fuller flavour.
 
To peel them it is necessary to hold the asparagus by the tender tip and, with a kitchen knife or a vegetable peeler, it must be peeled from top to bottom, being careful not to touch the head, and turning it to homogeneously peel all of it. Lastly, the bottom part of the stalk is cut, and the asparagus is washed in cold water.
 
To boil them, fill in a deep pan with water and bring it to the boil. As soon as it begins boiling, add three teaspoons of salt and 1 teaspoon of sugar, carefully insert the asparagus piece by piece so as to maintain the temperature. Boil for approximately twenty minutes until they are tender (you should be able to easily spear them with the fork).
 
Once boiled and drained, it is recommendable to eat them warm, to be able to appreciate their full flavour with a drizzle of extra virgin olive oil. However, this may seem a bit simple for some so at the end of the post I have included three dressing recipes to accompany the asparagus, wonderful recipes for this summer if you fancy a healthy, light and fresh meal which is really simple to make.
 
Vegetables have, in general, a low-calorie content, but the asparagus is a particularly low-calorie vegetable. It almost has no fats or carbohydrates, and strangely has a strangely high amount of proteins for a vegetable. Its content of dietary fibre is very significant, as is the content of vitamins and minerals.
 
When mentioning vitamins, one needs to mention the presence of thiamine, riboflavin, niacin, and above all, alfatocoferol. This substance, also known as vitamin E, is one of the natural antioxidants we can find in food. It plays a very important role in the development and maintenance of the central nervous system, peripheral nerves and child and adult muscles. Nowadays, its influence on the cardiovascular risk profile and its inhibiting actions on the growth of leukaemia cells are being investigated. Although we do not have a specific organ to store vitamin E, we have small storage rooms in our liver and in the adipose tissue, with the added advantage that when someone loses weight (loses fat tissue), the amount of vitamin E stored in that tissue remains.
 
But beside these facts, the asparagus has a very characteristic substance: asparagine, a volatile substance which enhances the diuretic effect of the asparagus, helping with the water retention and hypertension associated with being overweight. It is a food source highly recommendable for:
 
  • People who need to eat low-calorie food, but which is rich in nutrients, as happens with people who are on a slimming diet
  • People who suffer from constipation, due to the high content of fibre of asparagus.
  • People who suffer from hypertension or water retention.
 
If they are going to be eaten fresh, they should be boiled with the smallest possible amount of water in order to minimise the loss of vitamins in the water.
 
The asparagus should not be washed after being peeled, as its water-soluble vitamins can be lost in the water. The stock resulting from the boiling of the asparagus is highly diuretic, which makes its use recommendable for soups, and rice dishes.
 
So who would have thought that this unusual vegetable would be so good for you and why isn't everyone eating them? Well, we should be and if you find them a bit bland at times here are a few ideas to jazz them up and create a wonderful summery starter or light main meal. Either buy fresh D.O.P Asparagus from Navarra when they are in season, (which at the moment they aren't ) or buy them already cooked in a glass jar or a can, try and find the large thick asparagus (extra grueso) rather than the thin cheaper ones, it makes all the difference. 


Asparagus with Pipirrana 


1 large green bell pepper 
1 large spring onion 
1 large salad tomato
1 small cucumber
Extra Virgin Olive Oil 
Sherry Vinegar
1 hard-boiled egg yolk
Salt
 
Simply finely dice up all the ingredients, put three parts olive oil to one part sherry vinegar and 1/2 part of water into a cup and blend, crush the egg yolk into powder form and then blend into the oil and vinegar, whisk together to form an emulsion, season with salt and pour the vinaigrette over the diced vegetables and leave the Pipirrana to macerate for at least an hour in the fridge. Then simply serve the asparagus cold with the "pipirrana" poured over the top.
 
TIP: If you want this meal to be slightly more filling add tinned tuna steak to the pipirrana while it is macerating.


Asparagus Tropicana
 
 
This is similar to the previous Pipirrana but with a  tropical fruity twist to it. You will need:
 
Slices of smoked salmon
1 mature mango 
1 large spring onion
1/2 red bell pepper
1/2 yellow  bell pepper
1 bunch of fresh chives
Extra Virgin Olive Oil
Sherry Vinegar
Water
 
Finely dice the mango, the spring onion, the red pepper, the yellow pepper and the chives as in the previous recipe.
Make the vinaigrette as before in a bowl but this time with no egg yolk. Pour the vinaigrette over the diced vegetables and leave for an hour to macerate. Wrap the salmon around the asparagus and place on the plate and then dress the asparagus with the tropical pipirrana.
 
 
Finally one for those who want a few more calories!.....
 
 
Asparagus from Navarra with Cashew Nut Cream
 
8 large white asparagus
2 tablespoons chives, cut in 3/4-inch lengths
Extra-virgin olive oil
Salt and ground white pepper
1 cup salted cashews
1/3 cup whole milk
 
In a food processor, pulse the cashews into a fine powder; be careful not to over-process and turn into a paste. Place 2/3 of the ground cashews into a small saucepan; set aside the remainder for garnish. Add the milk to the pan, with 1/3 cup water. Bring to a boil and immediately turn off the heat. Mix well and then set aside. Cut up one asparagus julienne style and place in a bowl with the olive oil, a pinch of salt and pepper, to taste and then set aside.
 
Heat the oven to max temperature and wrap the asparagus in double tinfoil, baste them with extra virgin olive oil before closing the foil. Place them in the oven for about 5 minutes until they are warm (if you use fresh uncooked asparagus, peel them and leave them in for about 20 minutes). Remove from the oven, unwrap them, place each of them on the serving plate on top of a spoonful of cashew cream, place the asparagus julienne on the side and garnish with crushed cashew.
 
Enjoy!


Like 2        Published at 8:39 PM   Comments (2)


Seabass in Salt - Lubina a la Sal
Friday, October 16, 2020


For those who read my blog regularly, will know that I don't often post fish recipes, seafood is quite common, but fish? Let's say it's not one of my favourite foods. That said, it doesn't mean I don't know how to cook fish...something I had to get to grips with because my wife happens to love fish, so now and again I will eat it or just cook it!

If you were following my blog a few months ago you will have read my recipe for "Pollo a la Sal"- Chicken in Salt - well that recipe really originated from this one and as I cooked it the other day I thought I might share it with you.

Cooking sea bass, or any other fish as it happens, in salt produces a rock hard shell around the fish thus keeping in heat and flavour. It is an extremely old cooking technique believed to have originated from the dead sea region and then it extended throughout the Mediterranean. Fishermen would lay the fish on a large stone and cover it with rock salt then they would light a fire beneath the stone, the rising heat would get trapped in the salt 'oven' so to speak and cook the fish evenly. Fortunately, no rocks are needed for this recipe! The technique, although old, is extremely effective and there are many reasons to keep using it and experimenting with different foods.

Despite what you might think, covering the fish with salt does not make the food salty. Being rock salt and bound with egg, it never penetrates the food and simply acts as a made-to-measure oven wall. Because the hard salt shell prevents any moisture from escaping during the cooking process it keeps the meat moist and tender.

The fish effectively cooks in its own juices whilst inside the shell, it does not require any fat or oil. The result is a really healthy fish meal - low in calories and high in nutrients. The egg binder makes the salt wall practically airtight keeping in all the flavour, be it from the meat or fish itself or the added herbs and seasoning - Nothing escapes


Ingredients for two people:

800 g Seabass – gutted BUT with the scales left on (if you can't find one big one, get two small ones and lay them side by side)
1.5 kg of Coarse sea salt
2 Egg whites
1 tbsp Ground Fennel

Steps:

  1. Preheat your oven to 200ºC.
  2. In a big bowl, use your hands and mix the salt, the fennel and the egg whites.
  3. Get an oven tray big enough to place the sea bass on. Lay down a 1 cm-thick layer of salt, covering the entire bottom of the tray or an area more than big enough to sit the seabass on. Remember to avoid scaling the fish as the scales protect the fish from the heat.
  4. Place the sea bass on top and cover it completely with salt except for the tail, which should remain uncovered. This is a little trick to test if the fish is cooked properly. Make sure you pat the salt down until it becomes firm and compact, then mark a line following the silhouette of the fish without penetrating the salt completely. This will help when you break it open after cooking. #See photos above#
  5. Bake in the oven for 18 minutes at 200ºC. Avoid opening the oven during this time.
  6. Remove from the oven. Pull the fishtail and if it comes away easily the fish is ready, if it is doesn't, it needs a little longer.
  7. Use a sharp knife and cut along the line previously marked out before cooking and take off the salt cap in one piece if possible.
  8. Remove the fish skin with care and use a couple of spoons to fillet the fish. Then remove the bones, in one piece, and finally remove the second fillet. It is important not to remove the fish whole from the salt as it will just fall to pieces.
  9. Drizzle with some parsley oil and serve warm together with some salad or grilled vegetables.

Enjoy!


Like 1        Published at 4:12 PM   Comments (2)


Fancy making your own Chorizo?
Friday, October 2, 2020

From time immemorial the people of Spain have used salt, spices and fresh air to preserve sausages. Over the centuries these skills have been honed to an art, creating a myriad of unique chorizos, salchichones, morcillas and more. Smoked paprika, garlic, cayenne pepper and salt - simple ingredients that, when mixed with pork, create the spectacular Spanish sausages and there is no sausage that is more Spanish than the Chorizo. Although they may seem complicated they are in fact very simple to make yourself at home. Chorizo has always been one of my favourites, especially the hot spicy ones that combine perfectly with a slice of cured manchego cheese and a glass of red wine, an authentic Spanish titbit. Cured meats throughout the Mediterranean were being produced ever since the discovery of salt approximately 3000 years before Christ. However, Chorizo was probably one of the latest in arriving. Chorizo is chorizo thanks to the smoked Paprika, and this ingredient didn’t reach Spain until the XVI century after the Spanish discovered America, up until that time all cured meats were pale in colour or black if they had blood in them. So successful was this spice that it quickly spread all over Europe and Chorizo became one of the most popular cured sausages of the time and still is today.

Chorizo is a typical Spanish sausage cured either by smoke or air, obviously, smoking is more complicated at home unless you happen to have a smoking house in your back yard, but fresh air is more than sufficient. They made with minced meat marinated in spices, of which the most popular is paprika, which gives it a red colour.  The traditional season for homemade chorizo has arrived as the cold weather helps the drying of the sausages.

Homemade Spanish chorizo is normally made with the same ingredients in all provinces with the only difference being in the blend of spices used, which can vary from region to region, the main ingredients for chorizo are determined by the amount of lean pork used. These are guidelines as there must be hundreds of recipes for chorizo around the country and proportions can vary and so can your tastes and preferences.

So as a guide, for each kilo of lean pork we will need to add:

300g of pancetta / uncured bacon

20g of salt

1 clove of garlic – crushed

20g of Paprika

8g Cayenne Pepper (if you want it spicier increase the cayenne pepper and reduce the paprika proportionally to reach 28 grams combined or vice versa)

Pig intestine (available from butchers or some supermarkets)

Cotton string to tie the ends

Optional:

200ml dry white wine

1 tsp. dried Oregano

Other additions can be parsley, cumin, bay leaf and thyme.

During the chorizo elaboration process at an industrial level, other ingredients are added: ascorbic acid is added to accelerate colouration and to prevent the fat from oxidizing and maturation regulators are added as sweeteners to promote the maturation of the chorizo and speed up the whole process. So if you make it at home at least you know it is completely natural with no additives or preservatives. All you need is patience.

Chorizo can be encased in a wide intestine or in a narrow intestine. Its form can vary being straight, “chorizo de vela” or like a horseshoe – “chorizo sarta”, the latter being the most popular form used traditionally.


To prepare chorizo at home you need lean pork such as pork shoulder or a “Boston butt” cut which is the high part of the shoulder of the pig. The first thing you need to do when making chorizo is to mix the meat thoroughly together with the fatty pancetta/uncured bacon. So this needs to cut up and coarsely minced. You can either get your butcher to do this or you can do it at home with a manual meat mincer or an electric one with a coarse cutting plate. You must bear in mind that the meat to make chorizo needs to be below 4ºC so the consistency is firm and you are able to cut it with a knife; it should also be checked that the temperature of the pancetta/bacon fat is between -2ºC and 2ºC to avoid melting during the mincing, leave the fat in the freezer for approximately 2 hours should be sufficient.


Secondly, when making the sausage at home, add the garlic, previously crushed in a mortar or a garlic crusher, add the salt and paprika/cayenne pepper; you can also incorporate a glass of dry white wine to help to mix and bind everything in together and make sure the mixture is as even as possible, so use your hands to do this. The chorizo mix must be left to stand for 24 hours in a cool place, which is why it's advisable to cover the mixing bowl with cling film or cotton cloths and put it in the fridge until the following day; then, with the help of a sausage filler or just a funnel, fill the intestines with the marinated mixture, trying not to leave air pockets and then tie them off at both ends with thick cotton string.


Finally, the chorizos must be pricked all over with a needle or a similar to remove possible air pockets that could have formed and then they are hung in a cool, dry and airy place leaving enough space between them that the air can reach the whole surface area and they will dry out properly in about three months; after this curing time the weight of the chorizo will have dropped by about 20% of its original weight. An ideal place would be an airy garage where you can hang them from a beam.


It is important to have in mind that the chorizos that are made at home do not contain preservatives, therefore it is important to control the curing of these sausages; the ideal drying conditions are areas with low humidity and cold temperatures, conditions that are perfect for curing meats. If the temperature and the humidity are too high they will not cure. In which case if you do live in a climate that is not very appropriate, you can just cure them for a week in a cool dry place and cook them on the barbecue or grill them. So as you can see its no more difficult than preparing a homemade beef burger.

Give it a go!


Like 0        Published at 5:55 PM   Comments (0)


Spam post or Abuse? Please let us know


This site uses cookies. By continuing to browse you are agreeing to our use of cookies. More information here. x