La Cordá de Paterna: Total Insanity
Wednesday, August 16, 2023
 If you have been to Valencia in Fallas you may think that you have seen the ultimate pyrotechnic spectacle but I can assure you, you haven’t. Some call it madness, some call it stupidity but the locals call it good fun! If you have been to Valencia in Fallas you may think that you have seen the ultimate pyrotechnic spectacle but I can assure you, you haven’t. Some call it madness, some call it stupidity but the locals call it good fun!
On Sunday 27th August in Paterna the annual celebration of 'La Cordá' will take place. This unusual celebration takes pyrotechnic spectacles to another level.
This crazy “fiesta” happened by accident just as the Tomatina in Buñol did. In 1898 a group of friends were having dinner in the street and this pleasant summer evening ended up in a battle of gunpowder rockets. Paterna in those days was famous for its development of the Valencian “Traca” a long length of rockets tied together which once lit would produce a chain reaction of explosions. This battle developed into an annual event until it became what it is known today as, La Cordá.
For those who have no idea what I am talking about, every year in Paterna near Valencia, a cage, which is 125m long and 8m wide is built along the Calle Mayor in the village. This cage is designed to hold approximately 200 experienced “rocket throwers”. The rocket throwers are each given their position inside the cage and allocated their series of rockets to set off. Following the commands of the Master Rocket thrower, a symphony of explosions and fire start to fill the cage around the 200 participants held inside it. The act lasts for about 20 - 25 minutes and a minimum of 50,000 rockets are released at a rate of 2000 rockets a minute!

Last year they set off 55,000 rockets in about 20 minutes! What looks like complete anarchy is actually planned and programmed to the second. There are three types of rockets used in the cage, one that is designed to fly along the ground rebounding off the walls and the participants, others that are designed to jump into mid-air and rebound off the bodies and walls and others that are designed to fly up over their heads and fill the air with trails of fire and sparks, all are capable of taking you hand clean off!

It is an extremely dangerous event, even though the locals don’t seem to be too worried about the dangers. Imagine 55,000 rockets being let off in a cage rebounding off the walls, the ground and the ceiling and you in the middle of it! That is The Cordá! Naturally, all participants aren’t suicidal and take same precautions wearing protective clothing and facemasks that are similar to fencing helmets to avoid major injuries but every year there are injuries and last year there were “only” 21 and not serious according to the local press, no one needed to be taken to hospital.
So if you happen to be near Valencia on the last Sunday of August this year, pass by Paterna and take a look at this insane spectacle!
 1
Like
Published at 9:02 PM Comments (0)
1
Like
Published at 9:02 PM Comments (0)
Seafood Popcorn!
Saturday, August 5, 2023
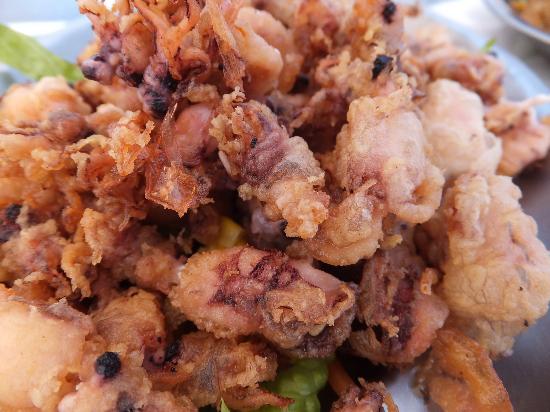
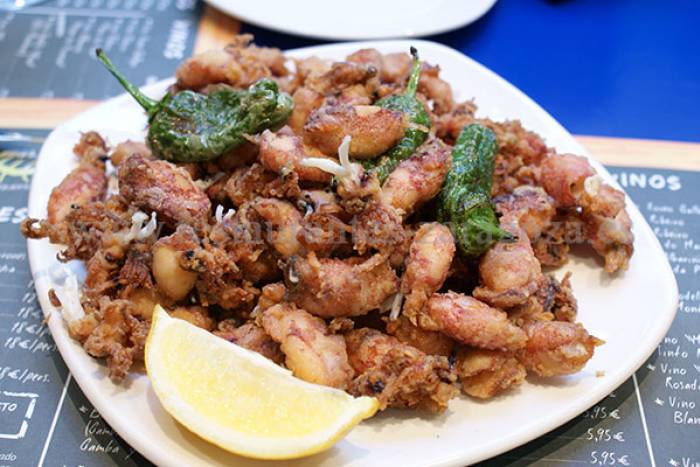 One of my favourite starters is a Mediterranean classic and one that always gets ordered whenever we have a paella away from home: ‘Puntilla de Calamar’, unbelievably tasty, moreish and easy to prepare. I like to refer to them as "seafood popcorn". The reason we love it so much is not just because of its taste but also because it is a light starter that doesn't kill your appetite before a paella, which can often be quite a heavy meal. One of my favourite starters is a Mediterranean classic and one that always gets ordered whenever we have a paella away from home: ‘Puntilla de Calamar’, unbelievably tasty, moreish and easy to prepare. I like to refer to them as "seafood popcorn". The reason we love it so much is not just because of its taste but also because it is a light starter that doesn't kill your appetite before a paella, which can often be quite a heavy meal.
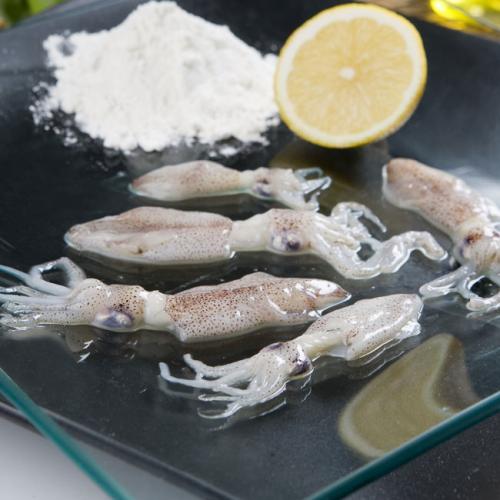
‘Puntillas de Calamar’ are effectively ‘baby squid’ and are eaten all over Spain as a starter but mainly on the coast and normally they accompany rice dishes, as they are light and flavoursome. They are effectively like seafood popcorn and I just can’t put them down when I get going! With or without a little squeezed lemon, they are just fantastic.
You will need for 4 people :
800gr Young Squid – “Puntilla de Calamar” (they reduce in size by around 50% when cooked)
Wheat flour - Tempura
Bread crumbs (optional)
Extra Virgin Olive Oil
Salt
They are extremely easy to prepare and a few details need to be addressed to achieve the best results. Firstly you will need to clean and prepare the ‘puntilla’. This means removing the eyes, which we will then dispose of, and removing the transparent tough membrane that goes along the inner body, effectively like a backbone and it just slides out when you pull on it. Then we thoroughly wash and dry the puntilla. This is the first of the key points that need to be addressed. If the puntilla are not dry the flour with go all stodgy and cause a real mess. So before we flour the squid, make sure it is completely dry.
Now to flour the squid: You can use a sieve or a plastic bag, whichever you find easier. So place the squid in a bag or a sieve, salt them lightly and cover with flour and shake repeatedly, ‘tempura flour’ is best but any wheat flour will work. Here comes another trick, although it is not always done and using just flour will work just fine, a good trick to get a nice and crunchy squid is to blend the flour with bread crumbs in a 50/50 mix. This will give them that crunchy edge which I love. Notice we are not adding egg here, we don’t want a batter, of any sort. Once the squid is completely covered with the flour mix we need to deep fry.
At this point, we need to fry the floured baby squid ‘puntilla’. Lastly, it is very important to make sure the olive oil is very hot, but not smoking. You can test the temperature with a small piece of bread, if it browns fairly quickly, it's ready. The oil needs to be hot so the squid doesn’t soak up any oil and the flour crisps properly, so if you are doing a large batch be careful how many you put in the pan or the fryer as the temperature will drop if you place too many in at once so do them smaller batches and make sure you have abundant olive oil in the pan, so they can float. Once they are golden in colour, remove them and place them on kitchen towel. Dry them and serve immediately with a few lemon quarters.
So there you are an extremely easy starter. Now, this same technique can be used for many types of seafood such as Large squid rings – Calamari (as I explained in a previous blog post) or even large prawns for dipping.
Enjoy!
1
Like
Published at 11:59 AM Comments (4)
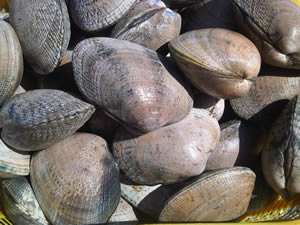
Summer Shellfish - Spectacular Clams!
Tuesday, August 1, 2023
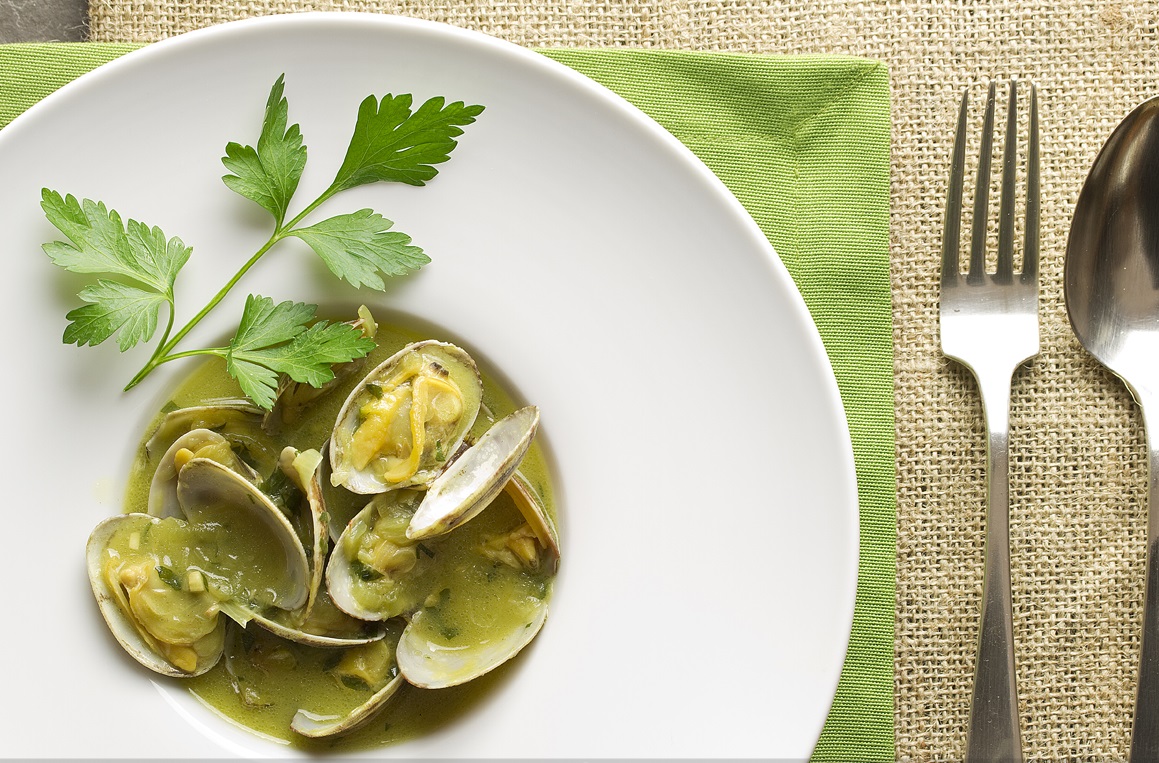
Clams in 'Salsa Verde' (green sauce) are traditionally eaten as a special dish up north in Galicia, and are a wonderful starter to share with friends and family. This dish makes for a fantastic light summer meal so why not give it a go this August. As is the case with most traditional recipes the quality of the ingredients is the key to a fantastic result.
This is a quick and easy dish to make and will take no more than 20 minutes to prepare if your clams are already clean and free of sand. The ingredients are easy to find but it is essential to use fresh parsley, a good dry and fruity white wine and of course fresh clams not frozen. If you are able to find them Galician clams are the best. I highly recommend using an Albariño white wine or a Ribeiro, both work wonderfully with this dish.
Ingredients to make Clams in Salsa Verde ( 2 people) :
 500 grams of clean clams 500 grams of clean clams
125 ml of white wine (Albariño Rias Baixes ó Ribeiro, preferably)
2 cloves garlic large
1 bay leaf
1 tablespoon of wheat flour
3 tablespoons fresh parsley, chopped
4 tablespoons olive oil
1/2 lemon
Salt and pepper
(some like to add 1 small crushed dried chilli – optional)
Before you begin, make sure the clams are clean and have no sand in them. If you bought them already cleaned, great, but if not you will have to clean them. There is nothing worse than chewing on a gritty clam!
So you will need to let them soak in water with salt for 2 hours, changing the water two or three times during that time. Once the clams are clean we can start with the recipe. Peel two cloves of garlic, mince and remove the heart of the garlic. Put them in a frying pan with 4 tablespoons of olive oil and bay leaf. Before they have browned add a tablespoon of flour and stir well. Let the flour brown a little but not burn.
Now add the wine, clams, a pinch of salt (half dessert spoon), a little pepper and sprinkle with two tablespoons of freshly chopped parsley. Cover the pan and leave on medium heat for 5 minutes. After 5 minutes remove the lid and see which clams have opened and remove them from the pan. Once they have all opened and been removed, check if the green sauce needs salt.
Now let the sauce simmer a little more without the lid and the clams, we want to reduce the sauce so it becomes slightly thicker.
We must ensure that the sauce is well blended, so don't remove it from the heat until the sauce is nice and thick, we also want to make sure all the alcohol has evaporated. When the sauce is ready put the clams back in and mix well with the sauce. This will heat the clams up again and then serve immediately. Serve in a bowl and sprinkle with the remaining parsley and accompany it with a wedge of lemon. Some prefer that acidic touch to the sauce that the lemon gives, but I prefer it just as it is. What I will do from time to time is add a dried chili or two depending on the number of clams. This gives it a wonderful kick! You can add the chilli right at the beginning with the garlic, that way it will flavour the olive oil directly.

The last thing you must remember is to have plenty of crusty bread because once you have finished the clams there will be loads of delicious sauce to soak up!!
Enjoy!
1
Like
Published at 3:38 PM Comments (1)
Spam post or Abuse? Please let us know
|
|