Preserved Oranges
Tuesday, April 30, 2013
I promised to post this recipe once I had access to the laptop again, so here it is!
Recently, I posted a recipe for Preserved Lemons. That recipe works just as well with oranges, and they can be used in much the same way when you're cooking.
As an added bonus, I’ve also unearthed a recipe for preserving oranges in syrup. These can be used in dessert recipes, or simply serve them up with ice cream. Try them with pancakes and yogurt for breakfast with a difference. They also make a lovely food gift.
The ingredients listed below should give you 2 large jars of oranges, but it’s simple to adjust the quantities up or down, according to your needs. I prefer to use brown sugar, as it gives a better flavour and colour. You can adjust the quantity of sugar if you wish, but make sure you reduce or increase the water in proportion to the sugar.
Ingredients
• 4 large oranges
• ½ cup of lemon juice
• 2 cups brown or white sugar
• 4 cups water
• Cinnamon stick and a few cloves (optional)
• 1 tablespoon Licor 43 for each jar (optional)
Rinse the oranges to remove any dust or sand from the skins, then slice into ½ inch rounds. If you’re using thin skinned Valencian oranges, there’s no need to peel them beforehand.
Place the oranges in a large glass or plastic bowl, then cover with 1 cup of water for each orange and allow to stand for 24 hours to soften the skins.
Place the oranges and water in a large pan and bring to the boil. Reduce heat and simmer until tender. Add sugar, lemon juice and spices, if using. Simmer until oranges become transparent.
Pack fruit, syrup and Licor 43, if using, into sterilised, wide-necked jars. Seal with tight-fitting lids.
Your oranges will be ready to use immediately, but should keep for quite a while. Once jar is open, store in the fridge and use within 2 weeks.

 1
Like
Published at 7:33 PM Comments (1)
1
Like
Published at 7:33 PM Comments (1)
Taking a short break - normal service will be resumed soon!
Monday, April 22, 2013
Hello, everyone. I know I've only recently started this second blog, but it's going really well, so I'd like to thank you for your encouragement and feedback. It's nice to know I'm writing what you want to read.
Unfortunately, life's going to get in the way of the blogging for a few days. My niece is getting married on Saturday in the UK, and of course, she wants us there. I did ask her if she could put it off for a few weeks until the blog is better established, but she wouldn't play along, so I have to take a break. I can't guarantee getting Internet access again until 3rd May, when we arrive at our caravan in Devon, but I'll make up for the shortage of posts then, I promise.
We're travelling to the UK by motor home, and then at the end of May we're returning to the Costa Blanca, but taking a detour through Portugal, as we've never been there before. I'm really looking forward to trying the Portuguese food, and hopefully I'll have some recipes or ideas to pass on when we get back.
See you soon, and please keep the questions and comments coming. If you get withdrawal symptoms, you can always check out my other blog on EOS, which has been going for a couple of months and has some recipes and food-related posts. I'll be moving them across when I get settled again, as I'd like to get all the food and drink posts together.

0
Like
Published at 11:42 PM Comments (0)
Preserved Lemons
Sunday, April 21, 2013
Even if you don’t have lemon trees in your garden or nearby, they are ridiculously cheap at the moment, but what can you do with them? Oranges can be eaten or juiced, but there are only so many gin and tonics with lemon you can consume, unless you want a side dressing of cirrhosis.
You can use lemons in fish recipes and salad dressings, but you may not want fish and salad every day. ‘If only there was a way to preserve them to use in recipes for months afterwards,’ I can hear you say – I’ve got very good hearing.
Well, people, I have the answer to your prayers. Here’s a simple recipe for preserving lemons. You need to wait for 3 – 4 weeks before you can use them, but they will keep in the fridge for at least six months, and you can use the pickling liquid in salad dressings and soups to give an interesting twist.
To use the lemons, remove them from the jar with a wooden or plastic spoon, as metal spoons will tarnish. Rinse to remove the salt, and remove pips. Some recipes call for just the preserved rind of the lemon, others use the whole fruit. Not sure how to use them in cooking? ‘Just Google ‘cooking with preserved lemons,’ and you’ll come up with thousands of recipes!
Preserved lemons are North African ingredients, but they are used with chicken, lamb, fish, chick peas and salads, and we’re not so far from Morocco! Experiment with preserved lemons and see what culinary delights you can come up with.
Use lemons with unblemished skins, as they will look better in the jar. Prepare lemons at room temperature to extract the most juice. The spices are optional. I just use peppercorns and a bay leaf, so my lemons are not too strongly spiced, but you can always make 2 versions, if you have enough lemons.
Ingredients
• 8 – 12 lemons, depending on size.
• 1 large or 2 small sterilised pickling jars
• Sea salt
• Cloves, coriander seeds, cinnamon stick, bay leaf, whole peppercorns (optional)
Add 2 tablespoons of salt to the bottom of the jar. Now wash and dry your lemons, and trim the tips from each end so they are almost round. Cut lengthways down the lemon, but not right to the bottom of the fruit. Now make another cut, so you have 4 quarters of lemon which are still attached to the base.
Rub the inside and outside of each lemon with salt, then place in jar, pushing the lemons down so they release their juice.
When the jar is full, top up with extra freshly squeezed lemon juice if necessary, and add another 2 tablespoons of salt. Store jar at room temperature for a few days, then place in fridge for at least 3 weeks. Turn jar upside down occasionally to ensure everything is well mixed. The lemons are ready when the rind is soft.

0
Like
Published at 9:41 PM Comments (3)
Albondigas - meatballs to you!
Friday, April 19, 2013
Albondigas, or meatballs, is a staple Spanish tapa. There are many variations, usually made with beef or pork, and each family and Tapas Bar will have its own secret recipe, which has often been handed down through generations.
You can make your meatballs spicy, or just full of flavour, and there are any number of different sauces, or salsas, to accompany them. Experiment to find your own favourite combination of tastes. Finely chopped peppers can be added to this version if you wish. This particular recipe originates from the Balearic Islands (Mallorca, Menorca, Ibiza and Formentera). Always use nice lean meat for best results.
Ingredients:
• 1 onion
• 2 cloves garlic
• 2 lbs. lean minced beef
• 1/4 cup freeze dried parsley
• 2 x 75g packets smoked bacon taquitos
• 1/2 cup (approx) bread crumbs for coating
• extra virgin olive oil for frying
• 1/2 cup flour
• Salt and pepper for seasoning, plus chilli flakes for more heat.
• 1 cup bread crumbs
• 4 cups beef stock. (Oxo or Bovril works well if you don’t have time to make your own stock)
• 4 tbsps freeze dried parsley for sauce
This recipe serves 6-8 as a main course or 10-12 as tapas.
Peel and chop the onion and garlic. Place the mince, onion, garlic, parsley and bacon in a large mixing bowl and mix thoroughly with your hands. Form into balls about the size of a table tennis ball. You may want to make them smaller for Tapas, so they can be speared with a cocktail stick. Now coat each meatball in breadcrumbs, then flour. I’ve used supermarket breadcrumbs with parsley and garlic for this, and it works well.
Heat ½ inch depth of olive oil in a large heavy frying pan. Fry meatballs a few at a time until golden, turning to ensure the meat is cooked through.
Remove meatballs from pan as they cook and place on a paper towel to absorb the extra oil.
Place bread crumbs, parsley and 1 cup of the stock into a large pot. Mix well. Turn heat to medium and add the rest of the stock. Stir and cook for about 5 minutes.
Add the meatballs to the sauce. Serve with rice, pasta or chips if having as a main course. Buen Provecho!
0
Like
Published at 10:08 PM Comments (1)
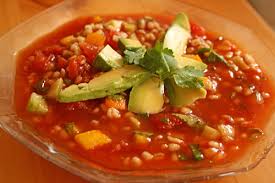
A great gazpacho recipe
Thursday, April 18, 2013
Gazpacho is a cold tomato soup, originally from Andalucia. Nobody knows where the name came from, but it may originate from the Latin for ‘crumbs,’ as true gazpacho is based on bread soaked in olive oil, garlic, vinegar and salt. These days, gazpacho has gourmet connotations, but originally it was a dish for the poor, based on bread and vegetables.
Some may say gazpacho is not a soup, as it doesn’t have a stock base and is not cooked; in fact, gazpacho has been called ‘liquid salad.’ But it looks like a soup, and has the consistency of soup, so let’s call it that, as it’s so much easier on my keyboard fingers!
Gazpacho can be served as a starter for a Spanish themed dinner, or, when the temperatures are in the 30s and you don’t feel like eating anything much, enjoy it on its own. It’s one of the few traditional Spanish recipes that caters for vegetarians, and should be made with quality fresh ingredients for best results. Use a hand held electric blender to make easy work of this typically Spanish dish. This recipe for traditional gazpacho serves 4 – 6 people:
Ingredients
• 5 slices stale white bread (at least 3 or 4 days old for best results)
• 900 g ripe tomatoes
• 2 cloves garlic, crushed
• 5 tbsps extra virgin olive oil
• 2 tbsps lemon juice or wine vinegar
• 120 ml ice cold water
• 1 tsp salt
• Pinch of paprika
Garnishes
• 2 slices bread, toasted or fried in olive oil and cut into croutons
• 1 hard boiled egg, chopped
• 1 small onion, chopped
• ½ red pepper and ½ green pepper, chopped
• ½ pepino (small outdoor cucumber) chopped. If you’re not preparing this in Spain, use a 3” piece of ordinary cucumber.
Soak the bread in cold water for about 15 minutes, then squeeze out water and blend bread with garlic until smooth. Deseed and chop the tomatoes. Blend everything together and add salt and paprika. Drizzle in olive oil, then lemon juice or vinegar, keeping the blender running. Add water, using a little more or less to obtain the consistency you want. If you want your gazpacho really smooth, whizz it in a food processor, but I think it’s nice to have a little texture.
Chill your gazpacho until ready to serve. Serve garnishes separately for your guests to help themselves. Buen Provecho!
0
Like
Published at 1:50 PM Comments (1)
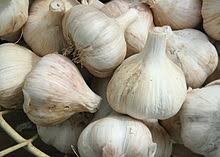
Getting the most from garlic
Thursday, April 18, 2013
If you ever wondered why there are no vampires in Spain, it could be because virtually everything is cooked or served with garlic. You can even buy garlic shoots in the market, which resemble spring onions but are pink at the bottom. However, they have a kick like a mule, as my husband found out. We could smell him coming for days afterwards! The Spanish eat them in salads, but it’s an acquired taste.
In Spain, garlic cloves are larger and the flavour is stronger than you may have been used to, so experiment to find the right level for you. You can always add more, but you can’t remove it from the finished dish! Grate or crush your garlic for the best dispersal of flavour. In England, I always finely chopped my garlic, but here it works better crushed in most cases.
There’s an exception to every rule, of course. For chicken breasts with a difference, slice almost in half, then slice a couple of large cloves of garlic lengthways and insert into the gap. Drizzle with olive oil, season with black pepper and wrap your chicken breast in foil. Oven bake or cook on the barbecue. Your chicken will be moist and full of flavour.
The Spanish don’t really do butter with their bread, but they often drizzle olive oil over it, then cut a clove of garlic in half and rub along the surface of the bread. Sprinkle with ground black pepper or chilli flakes for a delicious snack any time of the day.
When you visit a Spanish restaurant, you will invariably be served with bread and garlic mayonnaise, or ali oli. You can buy ali oli ready made in jars in the supermarket, but I prefer to make my own, and it’s so easy. Buy a good quality mayonnaise, then add loads of crushed or grated garlic until you can smell it coming. Make sure everyone has some, though, or there may be trouble ahead!
Recently, we eat in a local hotel, and the ali oli was deliciously different. I prised the secret out of the chef, and he told me he added a splash of lemon juice and some freeze dried parsley along with the garlic. This made for a more colourful product, with the added bonus that parsley helps to kill the ‘garlic breath.’ Try it soon – you’ll love it.
Add whole, peeled cloves of garlic when roasting vegetables for an improved flavour. The brave ones can eat the garlic along with the vegetables, but if you don’t want to eat it, don’t discard it. Mash the cooked garlic cloves, wrap in foil and store in the fridge for up to 3 days. Add to soups and casseroles for an extra dimension of flavour.
I hope I’ve given you some ideas for using garlic in your Spanish cooking, but do treat it with respect. One more thing before I sign off. If you’re unfortunate enough to get a wasp sting, cut a clove of garlic in half and rub the cut surface over the sting immediately, then every 20 minutes or so for the next hour. It takes away the pain and reduces the swelling – believe me, I know!
0
Like
Published at 1:42 PM Comments (0)
Are you making the most of your taquitos?
Wednesday, April 17, 2013
Maybe you know them better as lardons, but taquitos are those little cubes of smoked bacon or serrano ham that you see on the supermarket cold shelves alongside the processed meats. They usually come in 2 x 75g packets, and there's a perforation down the middle, so you can use one packet at a time if necessary.
They range in price from just over 1 Euro to just under 2 Euro, depending on the quality of ham that's used, and the great thing is that they have a long shelf life. I bought a packet last week, and the 'use by' date is the end of September! That means if it gets buried in the back of the fridge, I should find it before it goes out of date.
I use taquitos for all sorts of things. They're good to use in any situation where you need chopped bacon - such as in the ham croquette recipe I posted, or when making broad beans and ham tapas. Taquitos also make a great flavour addition to vegetable soups, and you can add them to tortillas de patatas if you like.
Taquitos can also help to stretch out other meats, such as in a bolognese sauce or chilli, and I've even used them to make a quick pasta sauce with mushrooms and peppers. They give an extra depth of flavour to chicken casseroles, or you can use them to make a flavourful chicken and ham pie or quiche.
Another way to use taquitos is as a pizza topping, and they make a lovely filling for a jacket potato as well. Scoop out the middle of the potato, and mix with lightly cooked taquitos and grated cheddar cheese, then pile back into the potato skins and brown under the grill.
If I'm using taquitos as the base to a soup or sauce, I'll add them to a little olive oil at the early preparation stage, when I'm sweating the onions. If I'm making croquettes or jacket potato filling, I just cook them for a couple of minutes in a little olive oil.
So, are you making the most of your taquitos? Maybe you use them in other ways - if so, please share them here.

0
Like
Published at 3:18 PM Comments (0)
Croquetas de Jamon
Wednesday, April 17, 2013
Croquetas de jamon are a popular tapa all over Spain. Spaniards love their croquetas, but if you’re put off by thoughts of the grey, unidentifiable mush that is often found in English frozen croquettes, think again. These are delicious, and surprisingly easy to make.
Make your croquettes with Serrano ham for the best flavour. I use ‘taquitos de Jamon Serrano,’ which is diced ham for cooking. You can buy them in LIDL and other supermarkets, for less than 2 Euro for 2 x 75g packets. I always keep some in, as they are also great in omelettes, soups or pasta sauces. The uses are endless, and you have the flavour of the Serrano ham without the bother of chopping it up. Serrano ham usually comes from black Iberian pigs. The Romans imported the pigs to make Prosciutto, of which they are justly proud, but remember, the Spanish got in there first!
Ingredients
• 2 beaten eggs
• 4 tbsps flour
• 3 x 75g packs of taquitos (or lardons). If unavailable, buy 225 - 250g of Serrano ham and dice it yourself.
• 1 small onion, finely chopped
• 2 cups breadcrumbs
• 1 cup of milk
• 3 tbsps olive oil, plus oil for frying
• Salt and pepper, a generous pinch of paprika and 1 tbsp freeze dried parsley for seasoning
Method
Saute onions in a little oil until soft, then stir in flour. Cook for a while, then whisk in the milk. Cook until sauce thickens nicely, stirring all the time to avoid burning.
Remove from heat, add your chosen seasonings and ham and stir thoroughly. Place the mixture in a dish and refrigerate until it’s firm and easy to handle. I make it the night before I need it, so the flavours have time to develop fully.
Using 2 dishes, put the eggs in one and the breadcrumbs in the other. If you like garlic, grind a little into the breadcrumbs, but not too much! Or for extra flavour, buy ready-made breadcrumbs with garlic and parsley.
Moisten your hands and form the chilled mixture into balls or conventional croquette shapes. Now dip in breadcrumbs, then egg, then breadcrumbs again, making sure croquettes are well coated. Chill for at least 30 minutes. If you’re short of time, place the croquettes in the freezer for about 10 minutes.
Fry in batches in a deep fat fryer for about 3 minutes. Don’t overload the fryer, as it will cool the oil, and your croquettes will soak up too much fat. There's nothing worse than a soggy croqueta, and there's not a lot you can do to redeem the situation.
Serve as part of a tapas lunch, or with drinks when you get together with friends. Buen Provecho!

0
Like
Published at 2:52 PM Comments (0)
Restaurant Review: Restaurante El Raso, Guardamar
Wednesday, April 17, 2013
One of the great things about living in Spain is that it's much cheaper to eat out than in the UK, so it's something we try to do at least once a week. However, the supply of Euros at Piddock Towers isn't infinite, so we tend to go for the lower end of the market. However, that doesn't mean we're prepared to settle for substandard food and service - we like to get the best deal for our money.
One of our favourite haunts is Restaurante El Raso, situated on El Raso Urbanisation, just off the Los Montesinos - Guardamar Road, or Lemon Tree Road, as it's called around here. El Raso is nicely fitted out and comfortable, and all the staff are friendly and efficient. And the food - oh, the food! It's magnificent. We always go for the Menu del Dia, because we can't see any reason to do anything else. It's never let us down, and we've been there lots of times.
The meal starts with bread and ali oli and tomato paste, followed by a salad. Then there's a choice of five starters and five mains. Paella figures on the starters list twice a week, along with a selection of soups and stews, plates of ham and cheese, stuffed peppers and interesting starters such as Eggs Flamenco and cauliflower with a cheese and tomato sauce.
Main courses always include a fish dish - either grilled or in a fantastic El Raso sauce. Chicken is on the menu every day as well, along with various other meat and vegetable choices. And para postre - again, a good selection, including arroz con leche, fruit salad, flan and various 'tartas.'
Included in all this is a small beer, glass of wine or soft drink - all for the incredible price of 6.90 Euro! That's the Monday to Friday meal deal, and if you're thinking of going, I'd advise you to book, otherwise, you're likely to be turned away hungry. On Saturday, we decided to try the special weekend Menu del Dia for the first time. We'd had a hard morning shopping at Moncayo Market just along the road, so it seemed like a plan.
At 8.90 with no drinks, bread or salad included, the Saturday menu is a little more expensive, but still worth every centimo. There were four of us, and Tony, Jim and Joan opted for pancakes stuffed with chicken followed by grilled lamb cutlets. I had to be different - it's what we creative types do best - so I went for grilled prawns followed by chicken breast in wine and mushroom sauce. Prawns? Think Pink Moby Dick - they were huge, with a tasty salad and dressing, and our main courses were also excellent.
After desserts of fruit salad, crema catalina and ice cream, we were offered liqueurs as part of the deal - Bailey's brandy, limoncello or apple schnapps. The total for the four of us, including two drinks each and a couple of coffees, was just 52 Euro. A real bargain - and excellent food. If you're down this way, pop into Restaurante El Raso and tell them Sandra sent you.

0
Like
Published at 2:39 PM Comments (3)
Home made lemonade - a change from alcohol, and almost as nice!
Wednesday, April 17, 2013
The orange trees on the Costa Blanca are mostly bare now, but there are still lots of lemons around. As with oranges, there’s been a real glut this year, so the shops and markets are practically giving them away.
Now that the weather is warming up nicely, why not make some refreshing lemonade as a healthy, alcohol free alternative to beer and wine? Home-made lemonade has none of the chemical taste of some manufactured lemonades, and it really quenches your thirst on a hot day.
If you prefer fizzy lemonade, add sparkling water to dilute the lemon juice. For a slightly alcoholic version for a party, use semi seco cava.
Store your lemons at room temperature, to make sure they yield as much juice as possible. Chill the serving jug before use and have extra lemon slices, mint leaves and ice ready to garnish before serving.
If you prefer, make a larger quantity of lemon juice and store for up to 3 days in the fridge, diluting as required. A word of warning, though - once you’ve tried home-made lemonade, the stuff in the plastic bottles in the supermarkets will never taste the same again
Ingredients for 1 litre: (enough for 5 - 6 glasses)
• 4 – 6 lemons, depending on size
• 100g sugar – I prefer the flavour of demerera or unrefined granulated.
• 600ml boiling water
• 400ml chilled water or sparkling water to dilute the lemon juice.
Wash the lemons and thinly peel the zest from them with a vegetable peeler, leaving as much white pith behind as possible. Don’t use a zester, as you need to strain the pieces of zest before serving and it’s easier if the pieces are bigger. Also, larger pieces of zest means more oil will leach out from the skin, giving your lemonade more flavour.
Squeeze the juice from the lemons. If you have an electric juicer, this will extract the maximum amount of juice. Place the zest, lemon juice and sugar in a large heatproof jug.
Pour in the boiling water and stir until the sugar has completely dissolved. Cover, and allow to cool. I usually leave the zest to stand in the water overnight. It’s best not to refrigerate the cooling mixture, as it will prevent impair the flavour.
When the lemon mixture is cool strain into a serving jug, and discard the zest. Dilute with water, sparkling water or cava and sweeten with extra sugar if needed. Add lots of ice to the glasses and pour in the lemonade. Serve decorated with lemon slices and mint leaves.

0
Like
Published at 2:37 PM Comments (0)
Instant tapas - for when friends come and there's no time to cook
Wednesday, April 17, 2013
Think of Spain and you think of tapas, those delicious snacks which go so well with drinks on the terrace or at a pavement bar. Tapas allegedly originated in Seville in Andalucia, when someone ordered a glass of wine and asked for something to ‘tapar’ (cover) the glass to keep the flies away from the wine – even though the flies don’t drink very much. He was obviously one very thirsty or very selfish senor.
The barman covered the glass with a slice of serrano ham and ‘tapas’ was born. Of course, this could be an urban myth, but I think it’s a lovely story, which makes a fitting introduction to the subject of tapas.
Tapas is such a vast topic that it will take forever to do justice to this great Spanish institution, but you can ease into it gradually with some ideas for instant tapas, or for emergency supplies when friends turn up and there's not time to cook but you want to be hospitable. The main thing is to have a variety of taste experiences. The jars and cans on the supermarket shelves can serve up a wide range of instant tapas.
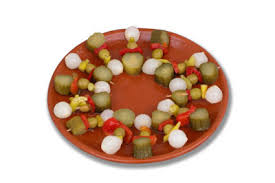
Whatever else you serve, make sure you have a variety of olives, preferably pitted, as they’re easier to eat. I like to serve black olives, green olives stuffed with anchovies and green olives stuffed with red peppers (pimientos). Simply serve in small dishes with a tub of cocktail sticks handy or, if you want to impress, use a slotted olive spoon.
Look out for banderillas, which will be next to the olives in the supermarket. These are mini skewers with silver skin onions, red peppers, slices of gherkin and olives, pickled in a spicy white vinegar. They come in jars of around 12, and cost roughly 1 Euro. Banderillas look good and taste even better.
You can also buy banderillas in tubs on the markets, either picante (spicy) or dulce (sweet). Some are more picante than others, ranging to slightly spicy to Blows Your Head Off, so proceed with caution at first. The same market stalls that sell banderillas will also have a wide range of olives to choose from, so be adventurous.
Another quick, easy tapa is mussels, (mejillones) which can be bought in tins in Spain for around 1 Euro – slightly more for bigger, fatter ones. Yes, I know fresh steamed mussels are better, but we’re talking quick tapas here, and they are really good, and available in a choice of sauces. Cockles (berberechos) also come cheaply in tins, as do squid rings (calamares). Add your own individual touch by sprinkling with freeze dried parsley and freshly ground black pepper and nobody will know they came out of a tin unless you tell them.
Spanish Serrano ham is a great delicacy, and every tapas bar worthy of the name will include ham and cheese (jamon y queso) in their selection. A whole serrano ham will set you back at least 50 Euro, but you can buy packs of ready-sliced ham in the supermarket, or get some freshly sliced at the deli counter. Again, you can also buy this on the market.
Iberico ham is best, but there are some good serranos around. Cut into strips about 2cm x 5cm, lay in a circle on a side plate and fill the centre of the plate with small cubes of any Spanish hard cheese - Manchego is good - and some roasted almonds (almendras asadas). It’s so simple to prepare, yet the combination of flavours is exquisite.
Serve your instant Tapas with a basket of sliced bread with tomato (pan con tomate). Split a small baguette-style loaf down the centre, drizzle with olive oil and rub with a cut clove of garlic. Then cut a large, juicy tomato in half and rub that along the length of the bread. Cut into finger-sized chunks and serve. Make sure there are serviettes on the table and invite some friends. Buen Provecho!
0
Like
Published at 2:35 PM Comments (0)
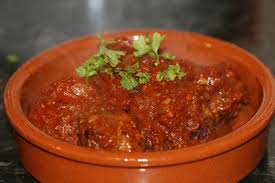
Mussels in spicy tomato salsa
Wednesday, April 17, 2013
I love mussels. When we lived in Cornwall, we used to collect our own from the rocks at low tide. One time, we were on Porthcothan Beach, and we didn't have a bag to collect them in. The mussels were huge, and I wasn't going home empty handed. We filled Tony's sun hat, and the pockets of his swim shorts, but there were some really big specimens there, and I knew they'd be delicious. I did the only thing I could - I filled my bikini top as well. There isn't a lot to fill it naturally, and it was a stretchy crop top, so there was plenty of room.
On the way back up the beach, we got talking to a couple of people who must have thought I'd had surgical enhancement until they got closer. It turned out they were staying on the camp site next to the chalet park where we lived, so they said they may call in for a drink in the bar. Before that happened, we met them in Tesco in Wadebridge, and the husband said, 'I almost didn't recognise you - you look different without your bra full of mussels.' He had a very loud voice, and everyone turned to have a good look, so it was a bit embarrassing all round.
But I digress. Here in Spain, the fish counters are heaving with mussels, and they’re very cheap - usually less than 2 Euro a kilo. This is a nice recipe with a spicy sauce which makes a tasty change from traditional mussels in garlic and white wine.
Some people worry about getting food poisoning from mussels, but there are 3 foolproof methods of ensuring you don’t eat ‘bad’ mussels. If any of your mussels are open when you get them home, tap the shell with the handle of a knife. If the shell closes, the mussel is alive and therefore safe to eat. Bin any that don’t close. When you wash the mussels, discard any that bob around on the surface of the water. Finally, any mussels which don’t open after about 5 minutes of cooking time should also be discarded.
I find that the girl on the fish counter in our local Consum sorts through the mussels for us, so we hardly have to throw any away. Last week I think we discarded three out of a kilo, which was good going.
A word about cebolletas, which are mentioned in the recipe. Cebolletas are like spring onions or scallions, but with enormous bulbs. They are not as strongly flavoured as ordinary onions, and you can use the tender green shoots as well. If you can’t get cebolletas, shallots will do nicely. Buen Provecho!
Ingredients (for 2 people as a light lunch or 4 as starters)
1 kg mussels
1 glass white wine
1 chilli pepper, chopped. (or 2 if you prefer the sauce really spicy)
4 cloves of garlic, crushed or finely chopped
2 cebolletas or shallots, finely chopped
500g large ripe tomatoes, grated
Freshly milled black pepper (optional)
1 tablespoon of fresh or freeze dried parsley
Extra virgin olive oil
Wash mussels well in plenty of cold water and scrub the shells to remove debris. Pull out ‘beards.’
Heat wine in a large lidded pan, then cook mussels until most of them are open (5 minutes aproximately). Be careful not to overcook, and discard any mussels which fail to open.
Remove mussels with a slotted spoon and set aside. Strain liquid through a kitchen towel in a strainer to remove any bits of sand or grit. Return liquid to pan and boil until reduced by half.
Heat a little olive oil in a pan and add cebollettas or shallots, garlic and chilli peppers. Cook for about 5 minutes until soft. Now add the mussel liquid and grated tomatoes and heat thoroughly. Allow to stand for a few minutes to allow flavours to blend. Taste and season with pepper if necessary.
Remove the empty half of the shell from each mussel, then stir them into the sauce until coated. Sprinkle with parsley and serve with fresh crusty bread.

0
Like
Published at 2:28 PM Comments (0)
Spam post or Abuse? Please let us know
|
|